
If you have ever experienced a leaky or an out to date kitchen faucet which has seen good days in the previous times. Before stressing out and ripping apart your kitchen sink, there are some basic things you need to know before buying a new kitchen faucet[black kitchen faucets pull out spray]:
1. Study your new faucet
There are wide varieties of faucets to choose from. You need to make sure that the new faucet is going to fit into your kitchen holes. Turn off the shallow valves under the sink. Open the faucet to confirm that the water supply has completely been shut off. This way you can ensure no waste of water supply.
2. Check the number of Holes in your sink area
Before you get a new faucet you need to check the number of holes installed on your sink area. It usually has 1 to 4 holes. A three-hole faucet won’t work on a single hole sink, but you can use a single hole faucet.
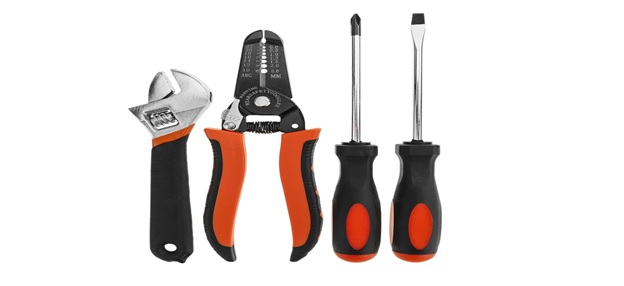
3. Prepare a list of tools you will need for the job
The basic tool kit that you will need for the removal and the installation of a new faucet includes things like a screwdriver, an adjustable wrench, and pliers.
4. Clean the faucets sink area
You need to clean the sink area containing the holes where the faucets are adjustable. Before buying a new faucet and ensuring whether it sits firmly in the holes, you need to remove the impurities from the holes. Also, clean up the area underneath the sink.
5. Buy a Suitable Faucet Replacement
Since different faucets install differently, you need to buy a suitable faucet to adjust easily in your kitchen sink. When you buy a new kitchen faucet, make sure you read the instructions.
Process of removing the faucet

To begin the installation of the new faucet in an existing sink, turn off the water valves underneath.
Turn off the power to the garbage disposal and disconnect it.
Disconnect the hot and cold lines. You will still have the remaining water in the pipes so instead of wasting them just store that water in a small bucket or a cup,
There is a pipe connected to drain water from the dishwashing process. You need to disconnect that as well. Make sure you disconnect all the drain connections by hand, a wrench or pliers would be unsuitable to use.
Usually, homes have got copper water supply lines. The other items would need some penetrating oil to loosen up any corroded connections on the old faucet for removal.
Take out all the objects in the under-sink cabinet, so that you will have a space to work under there.
The most challenging part of the faucet replacement project is the access to the nuts and the fittings you need to get through.
You need to get crawling under the sink which is not a comfortable place be. You can use some old towels for cushioning for a comfortable process of removal.

Before dismantling anything, it would be preferable to take some pictures in the beginning, in case there is any chance of forgetting when you need to gather up things for re-connecting.
Process of Installing a New Faucet

- Begin, by using an adjustable wrench to loosen the nuts that connect those supply pipes to the supply valves. If the nuts don’t come off easily due to being corroded, don’t force them. Just apply some penetrating oil of thin viscosity around each nut, so that the nut comes off easily. Have a small bucket and a handy old towel to catch any water that leaks out as you loosen the connection. Even though you have shut down the main water supply and drained out as much water as possible.
- If you are replacing an old sprayer assembly, the next step is to disconnect the hose that attaches the sprayers to the faucet. The way you do that depends on the way it had been hooked up.
- Remove the mounting nuts underneath the faucet. A specific basin wrench would be a great option to use for this part of the task since it is designed specifically to reach up into that tight area underneath the faucet.
- With the mounting nuts off, you can now lift the old faucet out of the sink.
- As the process of removing continues, you need to clean the holes and the sprayer attachment areas of the sink to remove any kind of hard water deposits, corrosions, or old putty remnants.
- Now that you are ready to install the new faucet, first, you need to read the paperwork on the box of the new faucet before installation. Attach the new supply tubes to the faucet carefully.
- Wrap the threads with a few layers of tough length tape to help prevent any chance of water leakage before screwing on the supply line tubes.
- Make sure that the connections are good and tight using the adjustable screwdriver to connect the supply lines for the new installation, but don’t use excessive force.
- Insert the new supply tubes inside the holes of the sink, put the faucet in its correct position, and screw on the mounting nuts. While tightening the mounting nuts, make sure that you don’t over tighten them.
- Attach the supply lines to the supply valves. Apply some tough length tape to the threads on the valves and then screw on the nuts.
- Re-connect the power to the garbage disposal to access the faucet.
- Remove the Aerator from faucet just to check the regular water supply and then turn on the faucet, both the hot and cold handles if you have a two-handled faucet.
- Turn on the water supply, let the water run for a few couples of minutes to flush out any debris, and check carefully at the faucet and under the sink to make sure there is nothing leaking.
- Shut off the faucet and then replace the Aerator from the top with the new one.
Main Photo Credit: Today.com